2011年2月25日星期五

Best Way to Share Your iPod/iPhone Files

iPod/iPhone have become an irreplaceable assistant of our daily life. While I have to say, compared to other portable device, iPod/iPhone also have some inconvenience, such as
Can't directly backup your video/ audio files to computer to avoid your files lost;
Can't share music and videos with your friends and family at will;
Have to use iTunes to add music and videos into your iPod/iPhone. Etc

So, here I will share some several useful tools to solve all your problems in this article.

Part one: solve the three problems with one tool-- Aiseesoft iPod Transfer
This Powerful iPod transfer can help you to backup files from iPod to PC , transfer files from one iPod to another one directly, and import video, audio files or folders from PC to iPod without iTunes,. And it supports all model of iPod and provides lifetime upgrade for free.
Free download it and have a try, it is totally clean- no adware/spyware/virus.


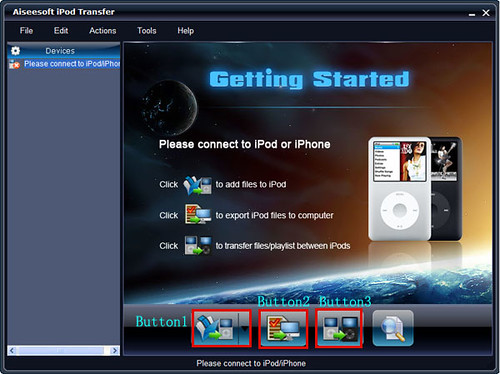
First usage: Import video and audio files or folders from Computer to iPod without iTunes
Step 1: Run the software, and connect your iPod/iPhone to your computer via USB cable.
Step 2: Click "Button 1" to seek the files or folders that you want to import to iPod and click OK.The process of importing will be finished instantly.

Second usage: Backup your iPod/iPhone files to your computer.
Step 1: Run the software, and connect your iPod/iPhone to your computer via USB cable.
Step 2: Open the library/playlist that you want to export files, and then check the file(s) you want to export in the file list.
Step 3: Click "Button 2" to select the destination of the exporting files and start exporting files.

Third usage: Transfer files from one iPod to another iPod
Step 1: Run the software, and connect two iPod/iPhone to your computer via USB cable.
Step 2: Open the library/playlist that you want to export files. Pick the files that you need to transfer.
Step 3: Click "Button 3", it will show you the folder of another iPod that you want to transfer to. Click OK. The transfer can be finished automatically.
If you are mac user, you can visit Aiseesoft iPod Manager for Mac

Part Two: Just need backup video/ audio files to computer to avoid your files lost
You can have a look Aiseesoft iPod to Computer Transfer


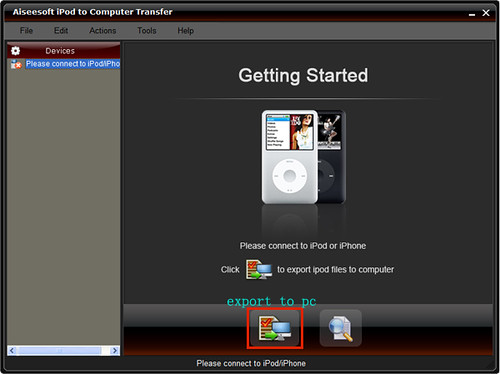
It can backup iPod video/audio files to computer, you don’t need to worry about losing
anything.
Step 1: Connect your iPod to your computer
Step 2: Choose files
Choose the songs, videos and other things that you want to backup at the top of the window
Step 3: Start to transfer
The most important and the last thing you need to do are to click the “export to pc” button .After
you click “export to pc” button a pop-up window will appear and with it you can choose where
you place your iPod songs and videos. Few seconds later you will have your iPod songs, videos
and other things on your computer.
If you are mac user, you can visit Aiseesoft iPod to Mac Transfer

Part Three: If you are iPhone user, share two similar tools for you: Aiseesoft iPhone Transfer, which can import video and audio files on PC to iPhone directly without iTunes. Backup files from iPhone to local disk without loss. Transfer files between two different iPhone.
and Aiseesoft iPhone to Computer Transfer.

2011年2月24日星期四

How to Rip DVD and Convert Video for Your iPad On Windows/Mac

Aiseesoft iPad Converter Suite is newly released software for iPad fans. It can rip any DVD files (DVD-Video, DVD folder and DVD IFO file) to iPad, convert all popular videos/audios to iPad formats and transfer files from PC to iPad, from iPad to PC and from iPad to iPad. It works similar to iTunes. So why do you always buy movies and songs from iTunes with extra money? It can help you make use of your resources.
The product is very easy in use. You just need download, install and run the trial version.


The product is multifunctional. It can trim, crop, edit video effect, merge, add text and image watermark, select audio track and subtitle, adjust video settings and snapshot.

If you are Mac user, you can choose Aiseesoft iPad Converter for Mac Suite.

2011年2月16日星期三

How to put DVD clips on Youtube, Myspace?

This software can convert DVD to FLV format for Youtube, Myspace and other video download sites. So you can share your own DVD clips with friends. After your movie is imported, select FLV as the output video format. Then log in Youtube, Myspace upload your video. But a whole DVD movie might be very large. By default, this software will convert the whole DVD to one file; if you just want several chapters of the DVD, you can just select the chapters you want to extract a part of DVD clips from DVD(you can preview the DVD clip before converting it). Or you can click "Trim" button to open the trim panel, drag the trim bar to set start time and end time to convert a clip from your movie. You can also type the exact time values in the Set Start Time field and Set End Time field to trim video.

2011年2月15日星期二

How to Convert Flip Video?

Flip video camcorder is becoming more and more popular among people because of its convenient, fast and easy-to-use. It can help you catch every moment that around you and share them with your friends at home or on line. But Flip video Camcorder records video just only in .MP4 format, how to make it to other formats and understood by Windows Media Player, Windows Movie Maker, iPod, iPhone, PSP and other PMPs.

All you need is just a Flip Converter which can help you solve this problem. Aiseesoft Flip Converter is the best Flip Video Converter to convert Flip video created by the Flip family: Flip Ultra, Flip Ultra HD, Flip Mino and Flip Mino HD as Flip Mino HD files conversion tool. With this Flip Video Converter, you can convert Flip video to any other video/audio formats MOV, M4V, AVI, 3GP, FLV, HD video and AAC, MP3, OGG, WMA, etc audio formats for all the players.

Here is a simple guide for you to follow and you need a Flip Converter.

Convert Flip video

Step 1. Files importing

You can load your video by clicking "Add File" button or clicking "File" button, you can choose "add file" on a drop-down list. Or even drag the video and audio files into the file list window directly.

After importing the files, you can click button "a" to preview the video.

Tips: It allows you to capture your favorite pictures when you preview.

Click button "b" the current picture in the preview window will be captured and saved in the specified folder in the image type as you have set.

Click button "c" to open the snapshot folder to view the captured pictures

Step 2: Choose Your Output Profile and Settings

Profile: Select an output format for the selected file

Settings: Click "setting" to open the Settings windows:

Video Settings: Set video encoding settings by selecting an encoder, a resolution, a frame rate and video bitrate.

Audio Settings: Set audio encoding settings by selecting an encoder, a sample rate, channels and audio bitrate.

Tip 1: For Resolution setting, you can choose the pre-set Resolution from the right drop-down list. You can also directly input your own resolution as the form of "XXX*XXX".

Tip 2: You can customize the video and audio encoding settings and save them as your own profile. After you have chosen the encoding options, just click the "Save as..." button and name your profile, and then the profile will be saved in the User Defined list. You can use the customized profile next time by selecting it from the list.

Step 3: Video Editing

Convert Flip video

1. Effect:

Click "Effect" to open the edit window to adjust the video effects. You can adjust the "Brightness", "Contrast", "Saturation" and "Volume".

2. Trim:

"Trim" function allows you to pick up any part of your video to convert. You can just convert a part of your video that you want.

There are three ways available:

Method 1: Enter the start time in the Start Time box and click OK, then enter the end time in the End Time box and click OK.

Method 2: Drag button below the Preview Windows to mark the beginning of your clip and drag it to mark the end of your clip during the preview.

Method 3: While playing video, click button to mark the beginning of your clip and mark the end of your clip during the preview.

Tips:

Click the second button to preview the video frame by frame.

Click preview button to preview you trimmed clip.

After you set trim time, the length of the captured clip will be shown in the Select Length box for your reference.

3. Crop:

"Crop" means to choose a certain play area to convert.

Method 1: Crop by adjusting the crop frame. The crop frame is the yellow line around the movie video. There are eight small adjustment boxes on the crop frame. Each adjustment box allows you to crop the movie video from a different position. To crop your movie video, you can just move your mouse cursor to an adjustment box and drag the crop frame.

Method 2: Crop by setting the crop values. There are four crop values at the bottom of the window: Left, Top, Right and Bottom. You can set each value to crop your movie video, and the crop frame will move accordingly.

Step 4: Conversion

After finishing all the necessary settings and editing, you can click "Start" to begin the conversion.

How to Convert DVD and Video to Your Fashionable iPad

iPad has been released for about a month, but it is pretty popular among people. I think you guys who got iPad are very proud. How do you make full use of its great space without spending extra money? Show it off before friends? It is the best choice to use DVD collection and video you have. But how do you deal with it?
Recently I got the information from internet. I feel it is useful for all, so I’d like to share it with you guys. It is third-party software that can rip DVD and convert video for iPad. And the whole process is so easy. They are Aiseesoft DVD to iPad Converter and Aiseesoft iPad Video Converter.

Next it is divided into two parts to describe it in details.
Part One: How to Rip DVD to iPad.
Firstly you need download the software: Aiseesoft DVD to iPad Converter. And then install and run DVD to iPad Converter.
The specific operating steps as follows:


Step 1: Load DVD.
Click "Load DVD" to add your DVD contents.
Step 2: Set output video format.
Click "Profile" button from the drop-down list to select the exact output video format that is the most suitable for your iPad. You can click the "Settings" button to set parameters of your output video such as such as Resolution, Video Bitrate, Frame Rate, Audio Channels, Sample Rate, etc. to get the best video quality as you want.
Step 3: Select the output path by clicking “Browse” button from the line of destination.
Step 4: Click the "Start" button to start the conversion.

Part Two: How to Convert Video to iPad.

Also it is the same. Firstly download the software: Aiseesoft iPad Video Converter. And then install and run iPad Video Converter.

The specific operating steps as follows:


Step 1: Add video.
Click "Add Video" to add your video contents.
Step 2: Set output video format.
Click "Profile" button from the drop-down list to select the exact output video format that is the most suitable for your iPad. You can click the "Settings" button to set parameters of your output video such as such as Resolution, Video Bitrate, Frame Rate, Audio Channels, Sample Rate, etc. to get the best video quality as you want.
Step 3: Select the output path by clicking "Browse" button from the line of destination.
Step 4: Click the "Start" button to start the conversion.

Tips:
The two pieces of software have some basically editing functions such as trim, crop, effect,
1. Trim:
Three ways to do trim:
a. Drag the “start scissors bar” button to where you want to start and “end scissors bar” button where you want to end. (1)
b. You can click the “Trim From” button when you want to start the trim during your preview and click “Trim To” button when you want to end.
c. Set the exact “start time” and “end time” at right part of the trim window and click “ok”.


2. Crop:
Three ways to do crop
a. Select one crop mode from the "Crop Mode" drop-list.
b. Dragging crop frame to choose your own crop.
c. Set your own crop value.


3. Effect
Drag the adjustment bar to find your favorite effect of Brightness, Contrast, Saturation and Volume.


4. Merge into one file.
Pick the "Merge into one file" to merge the files you choose into one output file. (2)

There is another piece of software named iPad Converter Suite. It includes DVD to iPad Converter, iPad Video Converter and iPad Transfer.