2010年7月30日星期五
Amazon Says Kindle Sales Will Pass Paperbacks Within a Year
Amazon gives out almost no real data about its Kindle sales, and even less guidance. So mark down this rare prediction from CEO Jeff Bezos, via an interview with USA Today: “I predict we will surpass paperback sales sometime in the next nine to 12 months. Sometime after that, we’ll surpass the combination of paperback and hardcover. It stuns me.”
2010年7月27日星期二
IPad Owners Are “Selfish Elites”; Critics Are “Independent Geeks,” Says Study
It’s not exactly official, but should also surprise no one: According to a new study the psychological profile of iPad owners can be summed up as “selfish elites,” while have-not critics are “independent geeks.”
Of course the “haves” would probably call the “have nots.” “cheap wannabes,” to which the “have nots” would retort: “FANBOI!!”
2010年7月25日星期日
How to Convert video and DVD to DV for DVD Studio Pro, Final Cut Pro, iMovie
This is a tutorial on how to convert video and DVD to DV for DVD Studio Pro, Final Cut Pro, iMovie.
Here are 2 parts:
Part 1, How to convert DVD to DV on Mac?
Part 2, How to convert videos such FLV to DVD on Mac?
Part 1, How to convert DVD to DV on Mac?
You need the following two software:
Aiseesoft DVD Ripper for Mac
MPEG Streamclip
Step 1, Rip DVD to formats that are compatible with MPEG Streamclip
Many free Mac DVD Rippers don't support ripping encrypted DVD. We recommend you Aiseesoft DVD Ripper for Mac (Intel Version, PPC Version) which can rip encrypted DVD to many other video formats such as MP4, FLV, MOV etc.
MPEG Streamclip Supports the following input formats: MPEG, VOB, PS, M2P, MOD, VRO, DAT, MOV, DV, AVI, MP4, TS, M2T, MMV, REC, VID, AUD, AVR, VDR, PVR, TP0, TOD, M2V, M1V, MPV, AIFF, M1A, MP2, MPA, AC3.
You need to use DVD Ripper for Mac to rip DVD to any video formats such as MP4, MOV compatible with MPEG Streamclip. After conversion, you can find the converted files in the output folder.
Tutorial on how to use DVD Ripper for Mac
Step 2, use MPEG Streamclip to convert videos to DV
Click 'File'>'Open Flies' to Open the converted files in the output folder.
Click 'File'>'Export to DV' to convert videos to DV.
That’s all.
Now you have converted DVD to DV on Mac. Then you can put the DV to DVD Studio Pro, Final Cut Pro, iMovie to edit.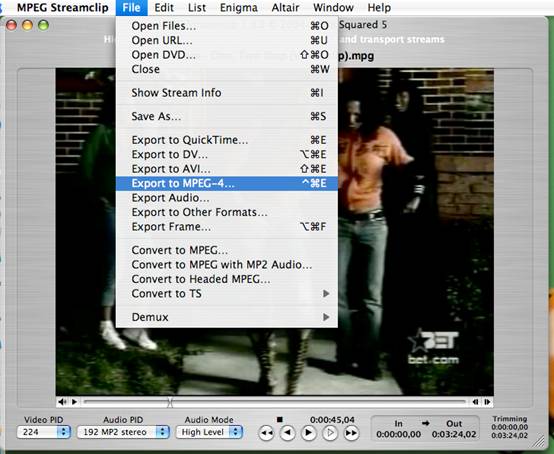
Part 2, How to convert videos such as FLV to DV on Mac?
Software you need:
Aiseesoft Video Converter for Mac
MPEG Streamclip
Step 1, Convert videos to the formats compatible with MPEG Streamclip (Optional)
MPEG Streamclip Supports input formats: MPEG, VOB, PS, M2P, MOD, VRO, DAT, MOV, DV, AVI, MP4, TS, M2T, MMV, REC, VID, AUD, AVR, VDR, PVR, TP0, TOD, M2V, M1V, MPV, AIFF, M1A, MP2, MPA, AC3.
If your videos such as FLV, 3GP, 3G2, WMV, XVID are not the above formats, you need to use Video Converter for Mac to convert your videos to MPEG Streamclip format.
Here is a tutorial on how to use Video Converter for Mac.
If your videos are compatible with MPEG Streamclip, please go to step 2.
Step 2, use MPEG Streamclip to convert videos to DV on Mac
Click “File”>”Open Flies” to Open the converted files in the output folder.
Click “File”>”Export to DV” to convert videos to DV.
That’s all. Now you are succeed in convert DVD to DV on Mac.
Then you can put the DV to DVD Studio Pro, Final Cut Pro, iMovie to edit.
Downgrade PSP to version1.5 using PSP battery
Lots of users downgrade their PSP to version 1.5 because they can upgrade their PSP to any version from 1.5. And if you upgrade your PSP to version 3.51, you can play any downloaded games and run any applications. Do you know that you can downgrade your PSP system to version 1.5 all by yourself by turning your PSP battery into a pandora's battery? All you need are an original PSP battery (with more than 50% charge) and a Memory Stick Pro Duo with 1GB memory or above.
I. Get ready (Reformat PSP memory stick)
Before you get started with the downgrade, you need to reformat your PSP memory stick. If you don't know how to reformat it, you can refer to the steps below:
1. Press the HOME button on the bottom left of your PSP.
2. Use the arrow keys to move to the Settings area, then move the up and down keys to go to System Settings.
3. Push the "X" button (or the "O" button, depending on which button is the "Enter" button of your PSP) and scroll to find the "Format Memory Stick" option. Push the "X" button again to select this option.
4. Your PSP will now confirm that you want to reformat the memory stick, choose yes and your PSP will be physically formatted in a few seconds.
To do the downgrade, you also need to download an application pack. After the downloading is finished, what you get will be a compressed application pack named "pandora", decompress it to the root directory of a hard disc, say Disc H. In this "pandora" folder, you can see four folders including mspformat, msinst, battery and installer, and a file named UPDATE.PBP.
Now you are ALL ready to turn your PSP battery to a Pandora's battery and use it to downgrade any PSP!
II.Turn your PSP battery into a padora's battery
Step 1: Logically reformat your PSP Connect your PSP to your computer. And your PSP will be recognized as a new hard disc, say K. Then click Start -> Run, input cmd in the popped up dialog box, and click OK to enter DOS system. Use the below commands one by one to run the mspformat file: Input "H:", and press the "Enter" Key on your keyboard. (Here H is the disc where the "panndora" folder is located) Input "cd pandora" and press the "Enter" Key on your keyboard. Input "cd mspformat" and press the "Enter" Key on your keyboard. Then input "mspformat.exe K" and press the "Enter" Key on your keyboard. (Here K is the name of the disc that your PSP is recognized on your computer.) After these commands, your PSP will be logically reformatted in a minute.
Step 2: Open the recognized PSP hard disc on your computer, create a new folder and name it "PSP", open this "PSP" folder, create a new folder and name it "game". Copy and paste the "installer" folder and the "battery" folder into the "game" folder. Then copy and paste the UPDATE.PBP file to the root directory of the PSP hard disc on your computer.
Step 3: On your PSP, switch to the Game option, press X or O (depending on which is the "Enter" key of your PSP). Go to "installer" and press X or O to run it.
In a few seconds, a file named "msipl.bin" will be created on the root directory of your PSP memory disc. And now, you should take out your memory disc and then put it back in, which seems to be useless but is a very necessary step.
Step 4: Connect to your PSP back to your computer. Then enter DOS system as mentioned in Step 1. Use the below commands one by one to run the mspformat file:
Input "H:", and press the "Enter" Key on your keyboard
Input "cd pandora" and press the "Enter" Key on your keyboard.
Input "cd minst" and press the "Enter" Key on your keyboard.
Then input "msinst.exe K K:\msipl.bin " and press the "Enter" Key on your keyboard. (Here K is the name of the disc that your PSP is recognized on your computer.)
When you see a popped up message asking if you are sure, click "Yes".
Step 5: Go back to your PSP, switch to the Game option, press X or O (depending on which is the "Enter" key of your PSP). Go to "battery" and press X or O to run it, press X or O to OK every popped up message to finish running the battery application.
Now, your pandora's battery has been created!
III. Use the created pandora's battery to downgrade your PSP
After you turn your batter to a PSP downgrade battery (pandora's battery), you can use it to downgrade your PSP by following the instructions below:
Take out your PSP Memory Stick and battery, then put back in your PSP Memory Stick first, and put your battery back in.Turn your PSP power on, when you see three options; select the Downgrade option, your PSP will be downgraded in a very short time and it will be automatically shut down afterwards.Turn your PSP on again, and you will see a blue screen. But no worries, you can just press the O key, and your PSP system is already version 1.5!
Note: The above process will turn your PSP battery to a pandora's battery that can be used for PSP downgrade. But the pandora's battery cannot be used to play PSP games, videos or music. And the process is not reversible. You will need to get an additional PSP battery for regular uses. However, you can use your pandora's battery to downgrade any PSP to version 1.5 or even repair you PSP.
Recommended Products For you:
DVD to PSP Converter for Windows
Aiseesoft DVD to PSP Converter for Windows is a professional application that is designed to convert DVD movie to PSP on PC.
PSP Movie Converter for Windows
Aiseesoft PSP Movie Converter is a professional video to PSP converter for Windows that can convert all sorts of video formats to PSP video on PC.
2010年7月22日星期四
How to Remove DRM protection from iTunes
iTunes is a champion of music, video downloading services. The user-friendly iTunes makes downloading music, videos quick and hassle-free; however, iTunes purchased songs and videos will not run on any other media player except for Apple products due to digital rights managements (DRM) which limit usages of devices or files.
This is a tutorial to remove DRM protection from iTunes. Then you can burn the iTunes videos to DVD and convert the iTunes videos to other format files.
Part 1, Remove DRM protection from iTunes Music using iTunes + CD-R/W
Probably the most widely accepted method for stripping purchased songs of DRM protection is burning tracks to a CD-R/W then re-importing back into the iTunes library. A method guaranteed to free you of DRM madness.
Create an iTunes playlist containing your purchased songs.
Insert a blank CD-R or a CD-RW.
Burn the playlist to disk.
Re-import the songs after a successful burn.
Delete the original purchased tracks.
Part 2, Remove DRM protection from iTunes using software
1. Remove DRM protection from iTunes music and videos for free on PC.
QTFairUse. It can Remove DRM protection from iTunes music and videos for free.
QTFairUse(.) for ITunes will allow you to convert protected m4p format files purchased in the iTunes Music Store to unprotected m4a files, playable everywhere. It supports fully automated conversion of all protected tracks in your iTunes library.
It will confirm whether you want to convert all the files in your library. Press 'y' and Enter to do that. Next it will ask if you want to skip already converted tracks (e.g. from the previous run). Press 'n' and Enter to overwrite them, 'y' and Enter to skip. After that, the script will begin conversion of all files in the library. Converted files will have m4a extension and will reside next to their m4p counterparts. To stop the conversion in process, press Ctrl-C in the console window. You can also close iTunes.
If you want to convert specific m4p files, pass their filenames as the commanding parameter. You can do that by e.g. dragging and dropping the files on QTFairUse6.exe. QTFairUse6 will convert them and exit. You can find converted files next to the originals, with m4a extension.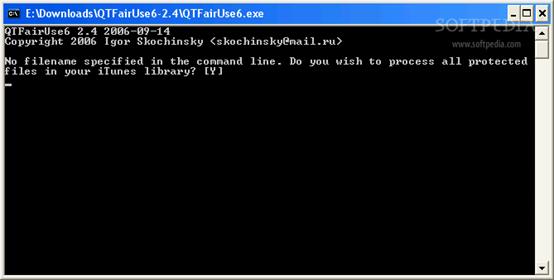
MyFairTunes. It can Remove DRM protection from iTunes music for free.
2. Remove DRM protection from iTunes music on Mac.
The software I introduce:
FairGame It is a freeware to Remove DRM protection from iTunes music on Mac OS X. FairGame(http://seidai.50webs.com/Seidai%20Software_files/FairGame.zip)will convert the songs you bought on the iTunes Store to an unprotected format (using iTunes default encoder) and keep all the original metadata, lyrics and artwork. FairGame doesn't do lossless DRM stripping. It re-encodes protected AAC files purchased in iTMS into unprotected AAC file using Apple's iMovie software.
What you MUST DO (only once) to get FairGame to work:
enable "Access for assistive devices" in the "Universal Access" system preference
select "Place clip in Movie Timeline" in the "Import" preference of iMovie HD
Then you can simply
select some songs in iTunes
click on the "Process songs" button
then don't touch anything and wait until it's done...(FairGame is scripting iMovie's interface to process the songs, don't interfere)
Tips:
If you want to burn the iTunes video to DVD, Just follow these steps:
1. Get the iTunes video to computer. You need to transfer the videos to iPod or iPhone and then use free iPod manager to get the videos from iPod or iPhone to computer.
Here is a tutorial: How to get videos from iPod and iPhone to Mac and PC for free?
2. Use freeware to burn the iTunes video to DVD. Here are the tutorials:
How to convert iTunes videos to DVD on PC for free?
Recommended Products For you:
DVD to iPod Converter for Mac
It's a specially designed iPod conversion program to Convert DVD to iPod touch, iPod classic, iPod nano, convert DVD to iTunes on Leopard.
iPod Video Converter for Mac
It can convert MP4, MOV, 3GP, AVI, RM, MPEG, ASF and FLV to iPod video with high output quality and various features.
2010年7月21日星期三
New Google Image Search: Now With 100 Percent More Image Ads!
At its image search event today, Google unveiled the biggest change to the product since 2001, with attractive features for both users and advertisers. Users get a much more Bing-like experience with more results (up to 1000), more information (via mouseover, not text) and less whitespace on the results page. Advertisers can take advantage of a new product, Google Image Search Ads, which allows the client to run thumbnail image ads in a clearly delineated space at the top of every results page. The launch will roll out over the course of this week.
2010年7月20日星期二
Yahoo’s 2Q Earnings Expected to Be Good–But Are Big Investors Getting Restless?
Suddenly–although not entirely unexpectedly–the major investors of Yahoo are getting restless.
If you talk to many of them in recent weeks, there has developed a confusion over the stock sitting stagnant in the mid-teens for far too long now, a vague disgruntlement that CEO Carol Bartz has not provided enough of a vision and innovation in her 18 months in charge to turnaround the iconic but long-struggling Internet giant, a nagging worry about the continuing exodus of top execs and, perhaps most of all, vexation that Yahoo (YHOO) is just too big not to be, well, bigger than it is.
“It just feels like there is nothing going on to get any momentum going,” said one major shareholder, whose sentiment is more common than not among longtime stock owners of Yahoo. “And it is not clear if there is anything on the horizon to get it going.”
Many point to the value of Yahoo’s Asian holdings, especially its stake in China’s Alibaba Group, as its most promising set of assets, valuing them much more than management’s recent attempts to focus on its media properties while shedding search technology costs under its ongoing partnership with Microsoft (MSFT).
“A Yahoo shareholder has to have the patience of Job,” said another major stock owner, noting shares of the Silicon Valley company are down over 10 percent compared to a year ago, compared to both an 8.3 percent rise at Google (GOOG) and a 3.9 percent increase at Microsoft.
To be fair, for the year-to-date, all Yahoo shares have declined less than either of those two digital giants.
And analysts are expecting some sunshine from today’s second-quarter earnings results, which will be reported after the markets close.
The company is expected to report a strong gain in profits, even with revenues rising only slightly.
The consensus: Yahoo will earn 14 cents a share for the three months ended in June, on $1.16 billion in revenue. That compares to 10 cents on $1.14 billion in the same period a year ago.
Several analysts are raising their ratings on Yahoo, noting that Bartz’s efforts to cut costs and improve margins have not been fully appreciated by investors.
Reaction to Yahoo’s results will be interesting, as Google’s earnings report earlier this week disappointed Wall Street, since its profit was less than expected. although U.S. revenue growth was promising.
“In particular, we believe that the robust and accelerating Google U.S. revenue results, based on both Search and Display growth, provide a broad positive market read-thru for Yahoo!,” wrote Citigroup analyst Mark Mahaney in his “cheat sheet” note ahead of earnings.
Mahaney reiterated his $22 a share price target, pointing to display advertising recovery, margin expansion, search share stabilization, Yahoo’s recent stock buyback authorization and the eventual value of the Asian assets.
Yahoo shares closed yesterday at $15.10.
2010年7月19日星期一
Shhh! Google Buys Metaweb to Boost Search Results
Here’s some actual tech news that slid out during Apple’s (AAPL) “There’s no Antennagate” event: Google (GOOG) announced that it had bought Metaweb Technologies, which it described as a start-up that “maintains an open database of things in the world.” Deeper explanation here, but the short version is that Google is suggesting that Metaweb will help it improve and refine search results.
Metaweb was founded in 2005. Investors include Benchmark Capital, Goldman Sachs (GS), and eBay (EBAY) founder Pierre Omidyar.
No purchase price was disclosed, but investors will need to see a decent-sized check in order to get a return: The company has raised at least $57 million in its five-year tenure.
(Thanks, Atul!)
2010年7月18日星期日
MKV file, MLV player, Free MKV Converter and MKV Burner on Mac OS
What is MKV file?
.MKV is a container format developed by Matroska. Matroska file types are .MKV for video (with subtitles and audio), .MKA for audio-only files and .MKS for subtitles only. The most common use of .MKV files is to store HD video files.It can hold different types of video and audio. For example, there might be an .avi file contained within the .MKV file. High Definition movies in 720 or 1080 pixel width format are often encoded and packaged as a Matroska format video with a .MKV file extension.
How to play MKV file s on Mac?
I recommend trying either MPlayer OS X or VLC Media Player. They are all free.
These excellent and free multimedia players can tackle many of the video formats unknown to QuickTime. They contain a decoder to decode the .MKV files. They will also play many of the formats you will find inside the .MKV file.
How to convert MKV to DVD, MP4, AVI, etc on Mac for free?
I recommend VisualHub to convert MKV to MP4, AVI, etc on Mac. It can convert MKV to iPod Nano, convert MKV to iPod Classic, convert MKV to iPod touch , convert MKV to iPhone, convert MKV to Apple TV, convert MKV to Xbox 360, convert MKV to PSP, convert MKV to PS3, AVI, convert MKV to MP4, convert MKV to MPEG, convert MKV to Flash, convert MKV to WMV and convert MKV to DVD.
Techspanion (The developer of VisualHub) has closed shop and after an outcry from fans, VisualHub, the popular video converter on Mac OS X have now gone open source. It has got new name Film Redux. You can download its open source and built it by yourself. Here is a tutorial: How to build iSquint and VisualHub?
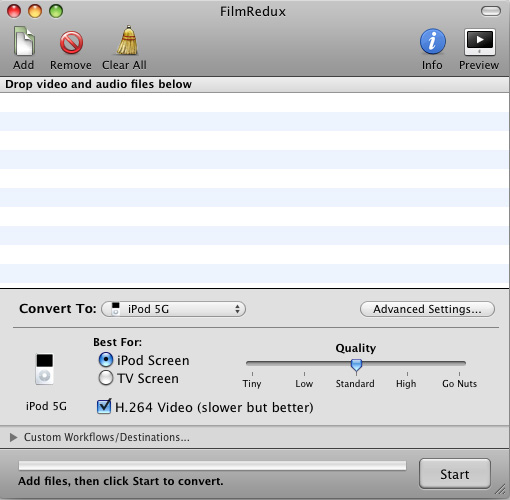
Step 1, Run Film Redux (VisualHub)
Step2, Load MKV videos
Insert your MKV files from your Mac .Click the Add files button to load your MKV videos.
Step3, Convert MKV to MP4, AVI, iPod, etc.
Here is the list of the formats that VisualHub can convert MKV
They are iPod Nano, iPod Classic, iPod touch , iPhone, Apple TV, Xbox 360, PSP, PS3, AVI, MP4, Quicktime, MPEG, Flash, WMV. Choose the format you want to convert MKV to and click Start.

That’s all. Now, we have converted MKV to iPod Nano, iPod Classic, iPod touch , iPhone, Apple TV, Xbox 360, PSP, PS3, AVI, MP4, Quicktime, MPEG, Flash, WMV.
How to convert DVD to MKV on Mac for free?
I recommend you use Handbrake to you to convert DVD to MKV on Mac . HandBrake is an open-source, GPL-licensed, multiplatform, multithreaded DVD to MPEG-4 converter. It can convert DVD to MKV on Mac eaisly and for free.
Step 1, Download and Install Handbake
Download the free program Handbrake. Check to see if your Mac has the system requirements; click on the apple icon in the top left corner and About this Mac. Then install HandBrake.
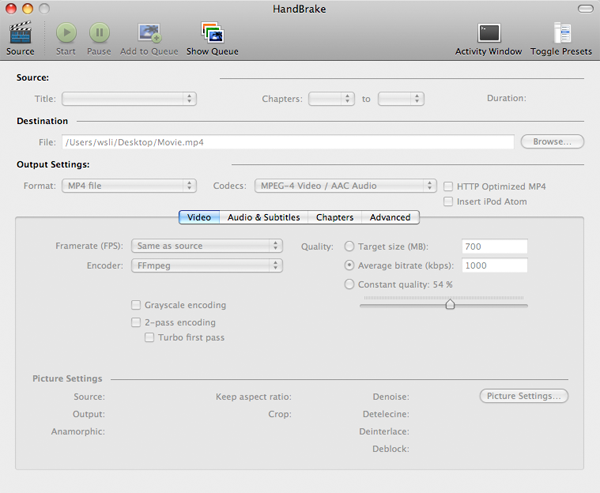
Step 2, Run it and insert DVD.
Select your favorite DVD disk and put it in the disk drive. Then run HandBrake and click Detected Volume to choose source. Click Open and you will be able to see many titles included in this DVD disk. Choose the longest title if this is a movie DVD, or choose your favorite chapter if this is an episode.
Step 3, Select Output setting
Select MKV files as output format and select other settings such as video quality, audio track, Audio Sample Rate, bitrate, Picture Settings, etc.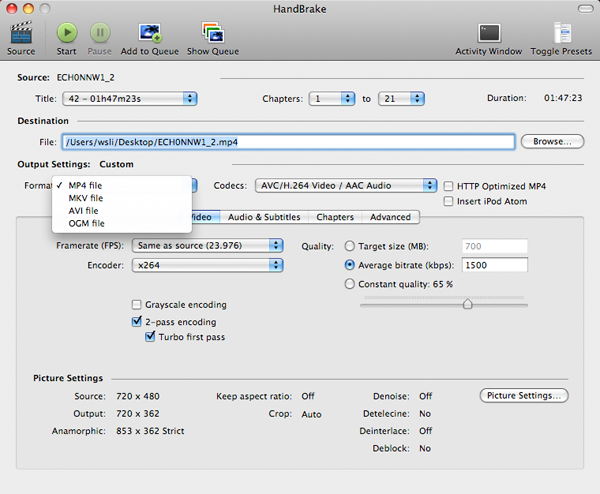
Step 4, Rip DVD to MKV on Mac
Check all settings and click Rip. A progress bar will show its ripping speed; depends on many factors like speed of Mac, filesize, etc.
That’s all. We have converted DVD to MKV for free now.
Note: Handbrake can not rip encrypted DVD movies. If you want to rip encrypted DVD movies, you can use this DVD Ripper for Mac. You can also use Mac the ripper which is free.
.MKV is a container format developed by Matroska. Matroska file types are .MKV for video (with subtitles and audio), .MKA for audio-only files and .MKS for subtitles only. The most common use of .MKV files is to store HD video files.It can hold different types of video and audio. For example, there might be an .avi file contained within the .MKV file. High Definition movies in 720 or 1080 pixel width format are often encoded and packaged as a Matroska format video with a .MKV file extension.
How to play MKV file s on Mac?
I recommend trying either MPlayer OS X or VLC Media Player. They are all free.
These excellent and free multimedia players can tackle many of the video formats unknown to QuickTime. They contain a decoder to decode the .MKV files. They will also play many of the formats you will find inside the .MKV file.
How to convert MKV to DVD, MP4, AVI, etc on Mac for free?
I recommend VisualHub to convert MKV to MP4, AVI, etc on Mac. It can convert MKV to iPod Nano, convert MKV to iPod Classic, convert MKV to iPod touch , convert MKV to iPhone, convert MKV to Apple TV, convert MKV to Xbox 360, convert MKV to PSP, convert MKV to PS3, AVI, convert MKV to MP4, convert MKV to MPEG, convert MKV to Flash, convert MKV to WMV and convert MKV to DVD.
Techspanion (The developer of VisualHub) has closed shop and after an outcry from fans, VisualHub, the popular video converter on Mac OS X have now gone open source. It has got new name Film Redux. You can download its open source and built it by yourself. Here is a tutorial: How to build iSquint and VisualHub?
Step 1, Run Film Redux (VisualHub)
Step2, Load MKV videos
Insert your MKV files from your Mac .Click the Add files button to load your MKV videos.
Step3, Convert MKV to MP4, AVI, iPod, etc.
Here is the list of the formats that VisualHub can convert MKV
They are iPod Nano, iPod Classic, iPod touch , iPhone, Apple TV, Xbox 360, PSP, PS3, AVI, MP4, Quicktime, MPEG, Flash, WMV. Choose the format you want to convert MKV to and click Start.
That’s all. Now, we have converted MKV to iPod Nano, iPod Classic, iPod touch , iPhone, Apple TV, Xbox 360, PSP, PS3, AVI, MP4, Quicktime, MPEG, Flash, WMV.
How to convert DVD to MKV on Mac for free?
I recommend you use Handbrake to you to convert DVD to MKV on Mac . HandBrake is an open-source, GPL-licensed, multiplatform, multithreaded DVD to MPEG-4 converter. It can convert DVD to MKV on Mac eaisly and for free.
Step 1, Download and Install Handbake
Download the free program Handbrake. Check to see if your Mac has the system requirements; click on the apple icon in the top left corner and About this Mac. Then install HandBrake.
Step 2, Run it and insert DVD.
Select your favorite DVD disk and put it in the disk drive. Then run HandBrake and click Detected Volume to choose source. Click Open and you will be able to see many titles included in this DVD disk. Choose the longest title if this is a movie DVD, or choose your favorite chapter if this is an episode.
Step 3, Select Output setting
Select MKV files as output format and select other settings such as video quality, audio track, Audio Sample Rate, bitrate, Picture Settings, etc.
Step 4, Rip DVD to MKV on Mac
Check all settings and click Rip. A progress bar will show its ripping speed; depends on many factors like speed of Mac, filesize, etc.
That’s all. We have converted DVD to MKV for free now.
Note: Handbrake can not rip encrypted DVD movies. If you want to rip encrypted DVD movies, you can use this DVD Ripper for Mac. You can also use Mac the ripper which is free.
2010年7月16日星期五
iPod Compatible Video
This article is divided into four parts separately introduce what is iPod Compatible Video, which video format is better for Apple iPod Video, is my video iPod compatible and how to make the video compatible with your iPod.
Part One: What is iPod Compatible Video?
Part Two: Which video format is better for Apple iPod video?
Part Three: Is My Video iPod Compatible?
Part Four: How to make the video compatible with your iPod?
Part One: What is iPod Compatible Video?
Firstly, I will introduce you what is iPod Compatible Video, iPod Nano Compatible Video such as iPod Video MP4, iPod Video H 264, the specifications page lists the following:
Apple iPod video specifications from their official website:
H.264 video, up to 1.5 Mbps, 640 by 480 pixels, 30 frames per second, Low-Complexity version of the H.264 Baseline Profile with AAC-LC audio up to 160 Kbps, 48kHz, stereo audio in .m4v, .mp4, and .mov file formats; H.264 video, up to 2.5 Mbps, 640 by 480 pixels, 30 frames per second, Baseline Profile up to Level 3.0 with AAC-LC audio up to 160 Kbps, 48kHz, stereo audio in .m4v, .mp4, and .mov file formats;
MPEG-4 video, up to 2.5 Mbps, 640 by 480 pixels, 30 frames per second, Simple Profile with AAC-LC audio up to 160 Kbps, 48kHz, stereo audio in .m4v, .mp4, and .mov file formats.
That’s a little confusing, but there’s only a few numbers you’ll need to remember for each format. The highest video bitrate with the H.264 codec is 768 kilobits per second. The biggest picture size for your H.264 movie is 320 pixels wide by 240 pixels high, the exact dimensions of your iPod’s screen. Your iPod can play H.264 video at framerates up to 30 frames per second. Every one of the applications that we’ll be using encodes with the Baseline Profile. Your audio needs to be encoded as AAC audio up to 160 Kbps, 48 kHz, and it can be in either stereo or mono. As long as you follow all the guidelines, your movie can be a QuickTime movie or an MPEG-4 movie file.
 Your other option, MPEG-4 video, supports a much higher bitrate than H.264 video - 2,500 kilobits per second. Using higher bitrates will also create larger files. The result: you’ll have less space for additional songs and movies. The biggest picture size for your MPEG-4 video is 480 pixels wide by 480 pixels high - three times as many pixels as your iPod’s screen is capable of displaying. Your iPod will shrink the picture proportionally so that everything fits on the screen. Again, the iPod can play videos up to 30 frames per second and our audio and file format options are the same as H.264 video.
Part Two: Which video format is better for Apple iPod video?
That’s a tough question. H.264 is arguably better because it offers high quality and a much smaller file size when compared to MPEG-4. However, both formats look quite good when you encode your video at the higher supported video settings. One thing that most people will agree on is that H.264 video takes longer to encode than standard MPEG-4. This means that converting a two hour movie to iPod video can take considerably longer using the H.264 codec (especially with QuickTime Pro’s pokey Export: Movie to iPod video option). Still, I prefer the H.264 codec in most instances.
Part Three: Is My Video iPod Compatible?
Some of the video files that you download from the web or from file sharing networks like BitTorrent may be iPod compatible - even if they’re not marked as such.
The easiest way to determine whether a video can be played on your iPod is to open the file in QuickTime and select Window: Show Movie Info. In most cases your video should be iPod-ready if the format is H.264 or MPEG-4, the audio is AAC, and the size of your video is 320 x 240 (or smaller) for H.264 or 480 x 480 (or smaller) for MPEG-4. Also, look at the data rate and make sure it’s not over 900 kbits/sec for H.264 or 2600 kbits/sec for MPEG-4.
Part Four: How to make the video compatible with your iPod?
If you have QuickTime Pro ($30 and worth every penny) or the latest version of iTunes (free!), this is, by far, the easiest conversion that we’ll talk about.
In iTunes, after you’ve added your video to the library, right click it. Select Convert Selection for iPod. iTunes will let you know if your video is already in the correct format. If it’s not, your video will slowly be converted to an H.264 video.
UPDATE: I’ve heard several complaints of iTunes creating iPod videos without sound. You should probably avoid using iTunes to convert your videos.
In QuickTime Pro, open your movie and, in the file menu, select Export… and in the export drop-down, select Movie to iPod (320 x 240) and click Save. QuickTime will create an optimized H.264 video with AAC audio.
You may want to go pour yourself a cup of tea or take a nap. If your file is large, QuickTime’s slow conversion process can take several hours.
If you’re an inexperienced user, I recommend using QuickTime Pro or iTunes because they’re absolutely foolproof. However there are other much faster, more powerful applications for converting your videos. Read on!
Don’t have QuickTime Pro? Aiseesoft iPod Video Converter!
Aiseesoft iPod Video Converter supports so comprehensive video formats including converting MPG, MPEG, MPEG2, VOB, MP4, M4V, RM, RMVB, WMV, ASF, MKV, TS, MPV, AVI, 3GP,3G2, FLV, MPV, MOD, TOD to iPod Video MP4, iPod Video H 264. You can customize your own output video by the settings function. For example, if you want a high quality video you can raise the values of Video Biterate, Audio Biterate and Audio Sample Rate, if you want a smaller file you can reduce the value.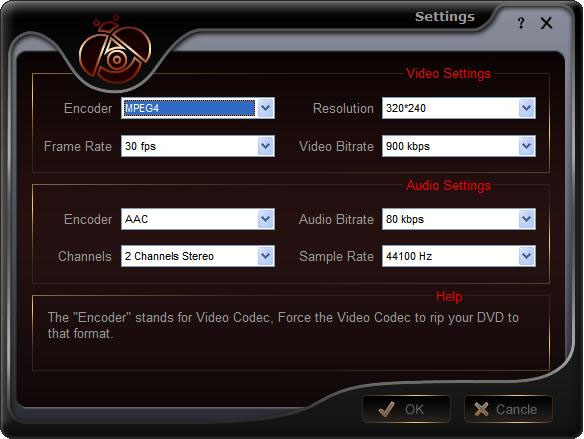
If you want to make your DVD compatible with your iPod and even transfer your iPod video to Computer, you can choose Aiseesoft DVD to iPod Suite which is an all-in-one solution to convert DVD to iPod Video MP4, iPod Video H 264 and convert video to iPod Video MP4, iPod Video H 264. Moreover, it can transfer video from iPod to computer. You don’t need to worry about losing anything.
For Mac user, you can choose Aiseesoft iPod Video Converter for Mac and Aiseesoft DVD to iPod Suite for Mac.
2010年7月11日星期日
How to copy DVD to ISO file for Mac
ISO file is an unattached file format (like RAR and ZIP): it merges a series of files into one single file according to a definite format. So they are stored in an uncompressed format., then it is more practicable to to transfer it over the Internet or via a LAN connection.
There lists the capabilities of DVD Copy for Mac on ISO file:
Copy: the ability to copy DVD to ISO file for Mac.
Burn: the ability to burn ISO file to an optical Disc.
Extract: the ability to copy the content of ISO file to a hard disc.
Free download this DVD Copy for Mac to have a try!
Buy NowFree trial(Intel PPC)Let’s take the example: How to copy DVD to ISO file for Mac
 Click “Full Disc ” button or “Main Movie Mode” button on the main interface to select the copy DVD mode.
 Select the source: Select the DVD-video disc here to copy your DVD file.
 Choose the target: Choose the ISO image target here for copying your DVD files as ISO file.
 Start to Copy:Click the “Start” to begin your DVD copying to ISO file on Mac.
learn more on: how to edit DVD file or ISO file with DVD Copy for Mac.
2010年7月9日星期五
YouTube’s New Revenue Plan: Gouge Warren Buffett!
Here’s the full text of a blog post titled “Announcing YouTube Pro *Wink*,” posted on the Google-owned (GOOG) site tonight:
It was with great pleasure that we heard billionaire investor Warren Buffett enjoys hours and hours of YouTube watching his favorite videos.
The “Oracle of Omaha” also suggested that YouTube should be charging him “a lot of money” based on the enjoyment he gets from YouTube. We agree and are happy to announce a new subscription offering: YouTube Pro. Pro will be offered for a limited time at the low price of $100 million/year. We don’t expect to sell many, but if Mr. Buffett wants to make sure he’s paying his fair share, we take cash, credit and, for him, personal check.
2010年7月6日星期二
Media and Retail Firms Meld Business Models Online
In search of new business models, some media and retail companies are treading on each other’s turf online.
One of the latest examples is Lockerz Inc., a youth-targeted media website that doles out points to members for watching videos with ads, taking surveys, signing up other friends, and completing other social-networking tasks. This week, Lockerz–which says it has amassed 16 million registered users–is launching a shopping component that lets users redeem those points, dubbed PTZ, for discounts from its own online mall from brands including Sony Corp. (SNE), Ben Sherman Group Ltd. and Nintendo Co.
Sites such as Lockerz, which mix shopping with editorial content, social networking and games, are sprouting up across the Web and drawing significant interest from investors as hot new businesses based on more than online advertising.
How to play DVD on Mac
This tutorial includes 4 parts:
Part 1, DVD Regions
Part 2, How to play DVD on Mac?
Part 3, How to Unlock DVD Regions on Mac?
Part 4, how to copy protected DVD Movie on Mac OS X
Part 1, DVD Regions
Region 1: North America; U.S. territories; Bermuda
Region 2: Europe; Western Asia; Kingdom of the Netherlands; Egypt, Japan, Lesotho, South Africa, Swaziland; British overseas territories, French overseas territories; Greenland
Region 3: East and Southeast Asia
Region 4: Oceania; Central and South America; Caribbean; Mexico
Region 5: Africa, Central and South Asia, Belarus, India, Mongolia, North Korea, Russia, Ukraine
Region 6: Mainland China
Part 2, How to play DVD on Mac?
VLC is part of a remarkably sophisticated suite of VideoLan applications available for a wide range of operating systems, ranging from Linux to Windows and, of course, Mac OS X.
Download and install VLC and open it, then select File > Open Disc. Click on the Disc tab, click on DVD, select the device, and click OK
Or select File > Open File..., select your VIDEO_TS folder, and voila! You're watching your movie.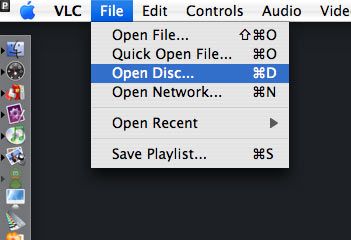
Part 3, How to Unlock DVD Regions on Mac?
Most commercial DVDs use encryption that keeps them locked to one or more “region codes,” meaning the discs you pick up in other continents usually won't play on an American DVD player. If you believe the movie studios, this encryption is a necessary tool in the ongoing war against piracy. Basically, it helps them release the same movie in different parts of the world—at different times and for different prices. However, because pirates rarely resell legitimate copies of movies (they are pirates, after all), this system's primary effect is to prevent movie collectors and frequent travelers from enjoying legally purchased films once they get home.
There are some multi-region DVD players out there. They are perfectly legal, but they tend to be pricey and rare. And if you are the jet-setting type who is likely to pick up foreign flicks in the first place, you probably want to watch them on the go using your laptop. That's why the most frustrating part of region codes is the way they affect laptop DVD players.
Although laptop DVD drives are technologically capable of playing any DVD, they typically force you to switch among region settings to play imported discs. Try switching this setting more than a fixed number of times (typically five over the entire life span of the computer), and the setting will be locked forever.
For example, if you switch from Region 1 (the United States and Canada) to Region 3 (parts of Asia) to watch a kung-fu flick you picked up on a trip to Hong Kong, you'll have to switch back to Region 1 before playing any movies you purchased at your local Best Buy. Watching that one Jet Li movie just burned up two of your five switches—and not even reinstalling your operating system will get you more. Fortunately, some clever programmers have created software solutions that circumvent disc regions entirely, turning your notebook into a portable multiregional DVD player.
There are plenty of programs for Macs that allow you to rip DVD movies on Mac. I recommend Aiseesoft DVD Ripper for Mac which allows you to rip DVD movies on Mac easily. This Mac DVD Ripper is fast in ripping DVD to all popular video and audio formats as it includes the features of DVD Ripper and DVD Audio Ripper. It can rip DVD video to video formats including MP4, AVI, MOV, M4V, 3GP, MPG, MPEG, FLV, etc. and it can convert DVD audio to MP3, M4A, AAC, AC3, etc. It's the best solution to rip a dvd to video or audio formats on Mac. This solution has its advantages (chief among them is that watching movies off your hard drive uses far less battery life than reading them from an optical disc.)
If you do not want to spend money, I recommend downloading VLC, an open-source media player that sometimes circumvents region encoding. The DVD drives on different computers (including various Macs) come from diverse manufacturers, a.nd VLC plays out-of-region discs on some, but not all of them. Unfortunately, there's no way to know if it will work on your system until you try. Fortunately, the program is free.
Part 4, how to copy protected DVD Movie on Mac OS X
Copy protected DVD action can turn into failure if you don't have appropriate software. Very often DVDs are protected against ripping and thus copying the contents of the disc to your hard disk doesn't work. Even if you do succeed in ripping the contents of the disc, to copy protected DVD also means to fit the files on your recordable DVD since the latter can only hold 4.4GB of data while the original DVD is more than 7GB in size.
Copy protected DVD software for those, who have no experience whatsoever with backing-up DVDs, is big deal. DVD Copy for Mac
2010年7月5日星期一
How to rip DVD, convert video, transfer iPod music and make iPhone ringtone for Windows/Mac
This guide aims to show you how to rip a DVD, convert video and transfer music between iPod and computer/two iPod, make your own iPhone ringtone.
Part 1. How to rip DVD to iPod/iPhone/Sansa/PSP/Zune and other MP4 and MP3 Players
Part 2. How to convert all video to MP4, AVI, FLV, 3GP, WMV, MOV, MPG, RM, RMVB, MKV, VOB…
Part 3. How to transfer music from iPod to computer, computer to iPod, iPod to iPod.
Part 4. How to make your own iPhone ringtone for free
Believe or not, to do the things above what you need is download Aiseesoft DVD Software Toolkit and few clicks.
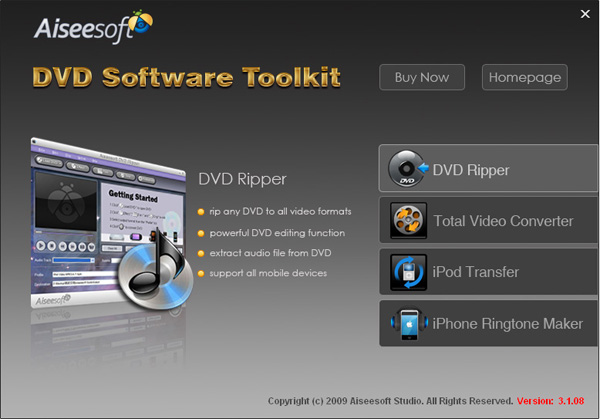
Part 1. How to rip DVD to iPod/iPhone/Sansa/PSP/Zune and other MP4 and MP3 Players.
Step 1. Click “DVD Ripper” on the main interface to run Aiseesoft DVD Ripper
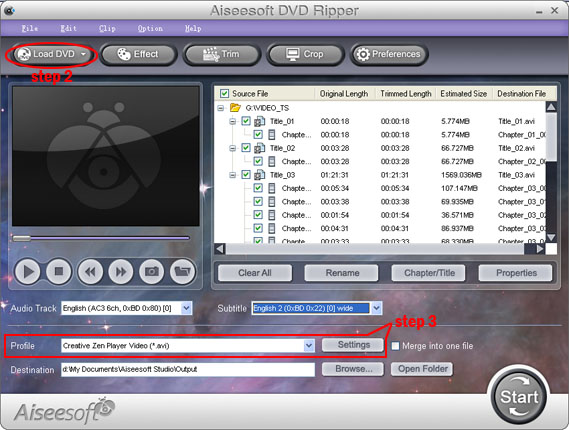
Step 2. Open your DVD Drive and put your DVD in it, then click “Load DVD” and choose “Load DVD” to load your DVD into this best DVD ripper.
Step 3. Choose your output format from the “profile” drop-down list. This best DVD ripper provides you so many formats that out of your expectation, such as “iPod video MPEG 4 (*.mp4)”, “iPhone 3G MOV 640*480 (*.mov)” and so on.
After you choose your output format, you can adjust your output video’s settings, such as “Resolution”, “Frame Rate”, “Bitrate”, “Sample Rate” and so on.
Click “Start” now to begin your conversion and you will get your video soon.
To make your output movie more enjoyable you can do some editings to it through this best DVD ripper. You can choose a part of your movie to convert (trim), remove the black edges of your DVD movie (crop) and also adjust the effect (effect) and select subtitle and audio track.
Part 2. How to convert all video to MP4, AVI, FLV, 3GP, WMV, MOV, MPG, RM, RMVB, MKV, VOB…
Step 1. Click “Total Video Converter” on the main interface to run Aiseesoft Total Video Converter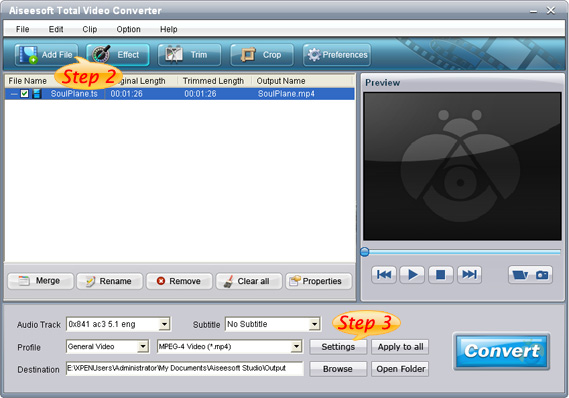
Step 2. Click “Add File” to load the video you want to convert.
Step 3. Choose output format by clicking “profile” and customize your own output video by clicking “settings” to adjust the Resolution, Frame Rate, Bitrate and so on.
Before you click “Start” to begin your conversion, you can do some editing works, such as pick up a part of your video to convert(trim), choose your own play region(crop) and put two or more files into one.(merge into one file).
OK, now you can begin your conversion
Part 3. How to transfer your songs and videos bewteen iPod and computer/iPod
First, Click “iPod Transfer” to run Aiseesoft iPod Transfer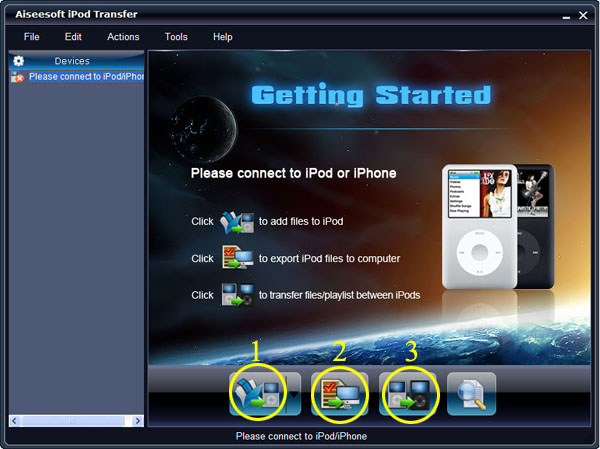
Click “Computer to iPod” button, it will allow you to transfer songs and videos from your computer to iPod easily.
Click “iPod to Computer” button, it will allow you to backup your songs and videos from iPod to your computer.
Click “iPod to iPod” button, it will allow you to transfer songs and videos from one iPod to another iPod dirrectly.
Part 4. How to make your own iPhone ringtone for free
Download Aiseesoft iPhone Ringtone Maker
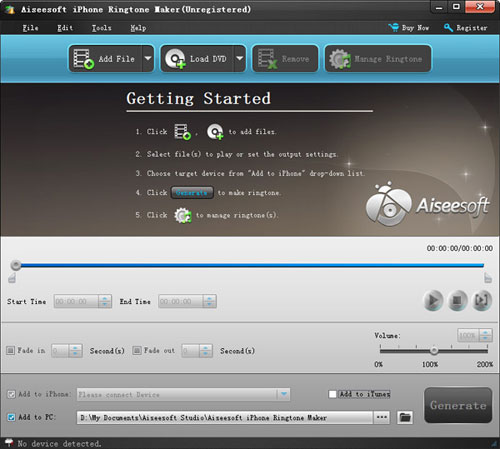
Step 1: Click “Browse” on the right side of "Input File" to import the file that you want to make ringtone from it.
Step 2: Play it and listen the music to find the segment that you want to use it as ringtone. Then drag and click the start & end slider to set your wanted segment, or type the start & end time in the corresponding text box directly to get the exact segment. You also can pre-listen the converted audio before generate.
Step 3: Click “Browse” on the right side of "Local Output Folder" to choose the output destination.
Step 4: Check "Export to iPhone" option, the converted ringtone will be load to your iPhone directly.
Step 5: After all the settings are finished, click “Generate” to begin making your own iPhone ringtone.
If you are a Mac user, I recommend you Aiseesoft DVD Software Toolkit for Mac
it has the same functions as the windows one. You can use it easy rip your DVD, convert your videos, transfer your iPod songs and videos bewteen iPod and your Mac and also make your own ringtone.
2010年7月2日星期五
How to get videos from video sites for free
This is a tutorial that explains the process of backing up a DVD on a PC using DVD Shrink. While there are many software solutions for backing up DVDs, the one on Windows I like is DVD Shrink. On Mac OS X, I like this DVD Copy for Mac.
that can copy DVD movie (D9 to D9, D5 to D5) with the entire movie in 1:1 ratio perfectly. This tutorial will be a concise explanation of how to backup DVD movie to DVD for free. There are many reasons to make a backup copy of DVDs one has purchased, keep reading to learn how to improve the quality of your re-encoded backups.
Step 1, download DVD Shrink
You can download DVD Shrink from: http://www.DVDshrink.org/.
For Mac users, you can download the DVD copy for Mac from here.
Step 2, Run DVD Shrink and insert your DVD movie into the DVD drive
The first thing you will need to do is open the disc. Click on "Open Disk" at the top-left of the program window. A small window will pop up. There is a drop down menu - select the drive and disk that you are going to backup. Then click OK. When you click OK, the DVD will be “analyzed”–this process will last for 1-3 minutes, then DVD Shrink will “suggest” a level of compression.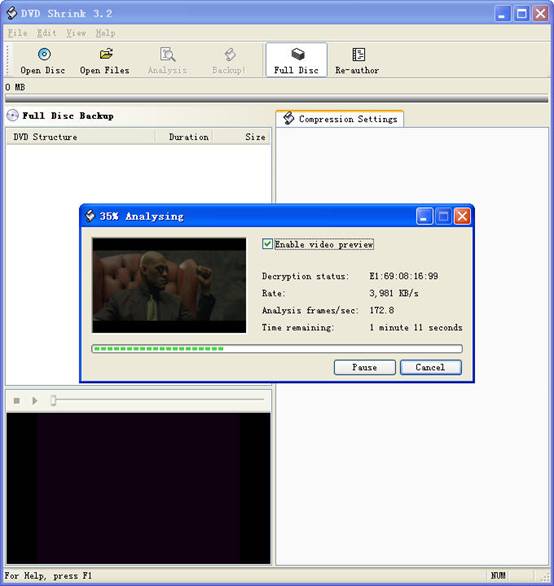
If you receive an error while trying to rip the DVD (like the one shown in the screenshot above), you will need to use another program such as DVD Decrypter to copy the DVD files off of the disc on to your hard drive. You need to minus the copy protections first. Click here to read how to use DVD decypher to minus the copy protections of DVD.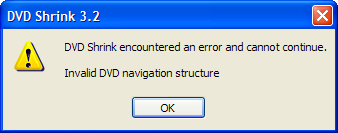
Step 3. Adjust compression for individual Titles (optional).
DVD Shrink will automatically select the highest possible quality settings that will fit on your disc. You could accept the settings that DVD Shrink chooses. You can also increase the quality of the main movie file by reducing or eliminating other video and audio files on the DVD.
Many modern DVDs will contain bonus footage, trailers, multiple surround sound modes, and other settings that one can reduce or eliminate to improve the quality of the main movie feature.
The main movie quality setting is reported to the left of a slider bar in the top right of the screen. In the screenshot below we see that the default setting requires that the main movie be compressed to 48.2% of its original level to fit on the disc. You can increase this percentage to improve the final quality of the backed-up DVD. But the output file will be larger.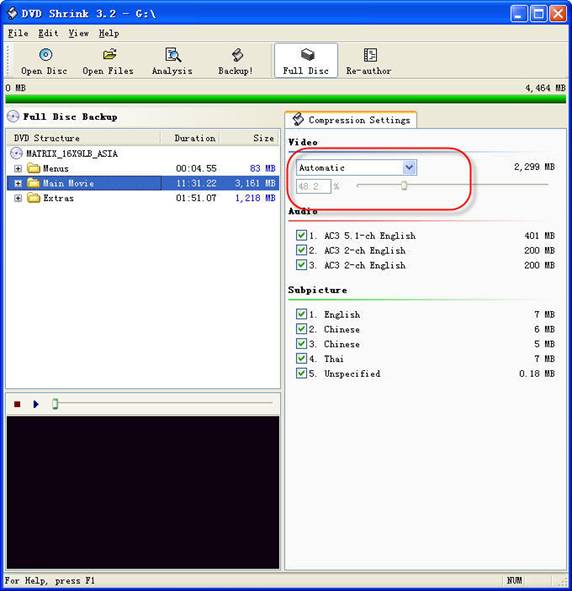
The way in which one goes about improving the quality of the main movie will be different depending on your specific needs. For example, when “Dolby Digital” and “DTS” 5.1 audio tracks are available, you can remove “DTS” (to save hundreds of megabytes), you can also choose to preserve “DTS” and reduce or eliminate other items from the DVD.
Some of the settings I made to this particular DVD were:
--Removed “5.1-ch French” audio track (went from 48.2% to 55.4% compression for main movie).
--Replaced certain Titles with “Still Image” (keep reading for more on this).
To improve the quality of the main movie, you'll need to reduce or eliminate other DVD features, each called a “Title” in DVD Shrink. Click the “plus sign” next to “Extras” in the menu to view the other titles.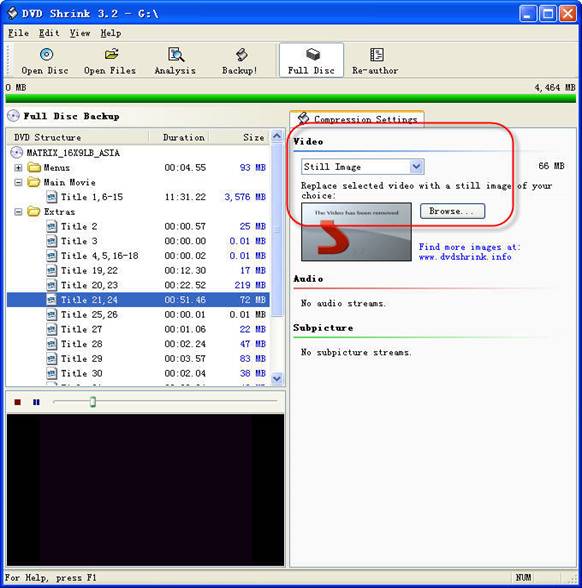
The Title I've selected below was 72MB. In this case the video was a “behind the scenes” feature that I did not wish to keep. Since one cannot completely remove any of the “Titles,” the next best thing is to replace them with a still image. In order to do this, select the title you want to replace, and choose “Still Image” from the drop-down menu in the top right. In this case the file went from 72MB to 66MB. The still image is configurable, simply drop an image of your own into the aptly named Still Images directory found under Program Files > DVD Shrink.
Step 4, Burn the re-encoded files to disc.
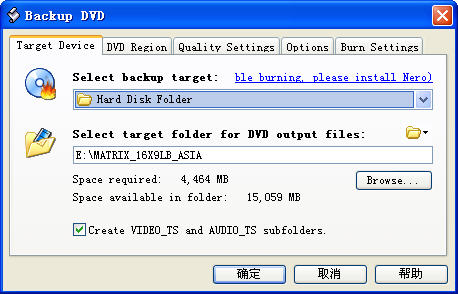
Click “Backup DVD” and Now select the folder where your temporary files will be saved. DVD Shrink needs to save a bunch of files on your computer (that actually compose your movie) so that it can burn that movie back onto another DVD. This is why you had to clear 5 gigs of space on your hard drive. Once the DVD backup has been burned, you can go ahead and delete these temporary files (the program does not do this itself).
You may as well select “Region Free” (default) under the DVD Region tab.
on the Burn Settings tab make sure “Maximum” burn speed is selected in the drop-down menu.
Once you have the settings the way you like them, begin the burn process. You'll see the “Encoding” happening first. There is a video preview that will show you where you are, but I believe that the encoding process goes slower with this setting enabled.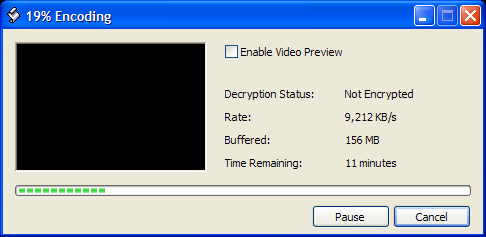
Once the files have been copied to your hard drive, your original DVD movie will eject from your computer.
You will also have a pop up asking you to put a blank DVD into the DVD burning drive of your computer that you previously selected.
Exchange the original DVD movie for a blank, burnable DVD. Push the blank DVD into the drive. DVD Shrink will begin burning the new DVD automatically in a few seconds. Now you will get a pop up that shows the progress while the program burns your new DVD movie. Once the new DVD has been burned, you will get a window that tells you that it's done. Click OK, close the program, and take your new DVD movie backup. All Done!
Note: DVD Shrink is only for PC users. If you are a Mac user, Please download DVD copy for Mac .
订阅:
评论 (Atom)